Using Predrilled Sea Glass for Jewelry Making
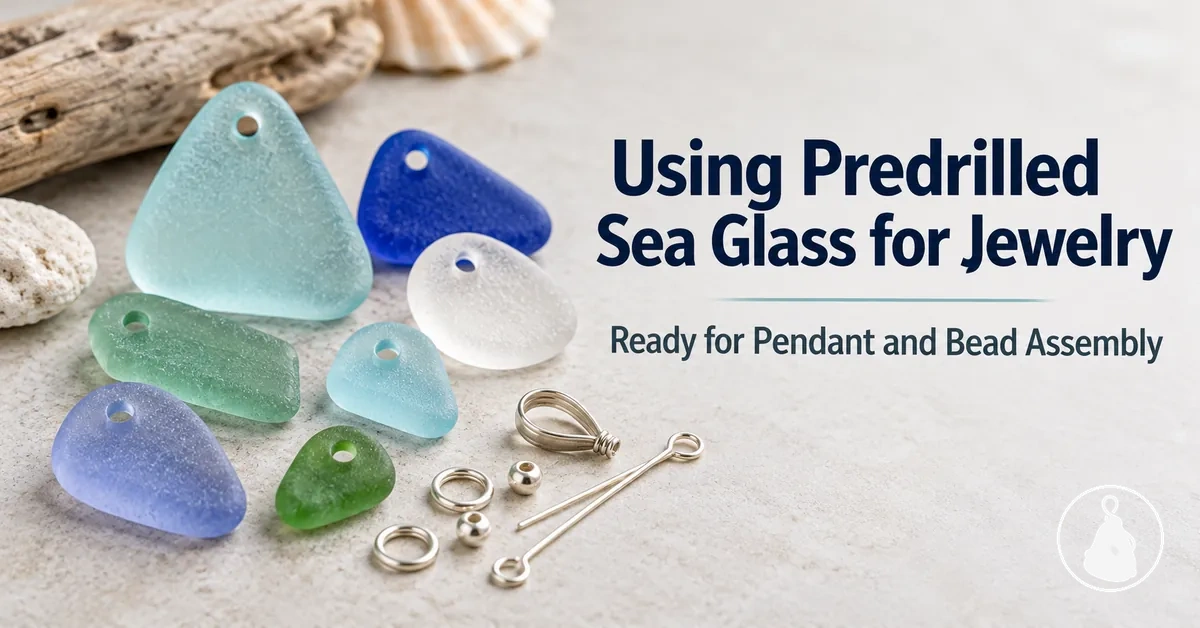
Predrilled sea glass can be used for pendants, beads, and other jewelry connections by passing a compatible jump ring, cord, or beading wire through its existing hole. Before assembly, confirm that the opening has intact surrounding glass and enough clearance for the chosen attachment; proceed only when the connection closes or threads without force, binding, or visible chipping.
Predrilled sea glass connection check
Use the hole, the attachment, and the finished movement as one decision system. The aim is a secure connection that does not need force at the drilled edge.
-
Inspect the hole
Check position, opening size, edge condition, and the glass immediately around the hole.
-
Match the attachment
The jump ring, cord, or beading wire must pass or connect with enough clearance for its required bend, closure, or movement.
-
Verify after securing
Confirm closure or retention, intended movement, and no new binding, chipping, or concentrated pressure at the hole.
- Proceed
- Hole area is intact, the attachment fits without force, and the finished connection moves as intended.
- Adjust
- Binding or resistance comes from alignment, clearance, or connector geometry and can be removed by changing the attachment approach.
- Stop
- A chip or crack affects the drilled area, or the connection still requires force after the fit is reassessed.
Because the hole is already present, the task shifts from drilling to checking the connection point, matching a compatible attachment, and verifying the finished fit. Predrilled glass is therefore different from a no-hole method, which secures the glass without using a drilled opening.
Table of Contents
How Predrilled Sea Glass Changes the Jewelry-Making Process
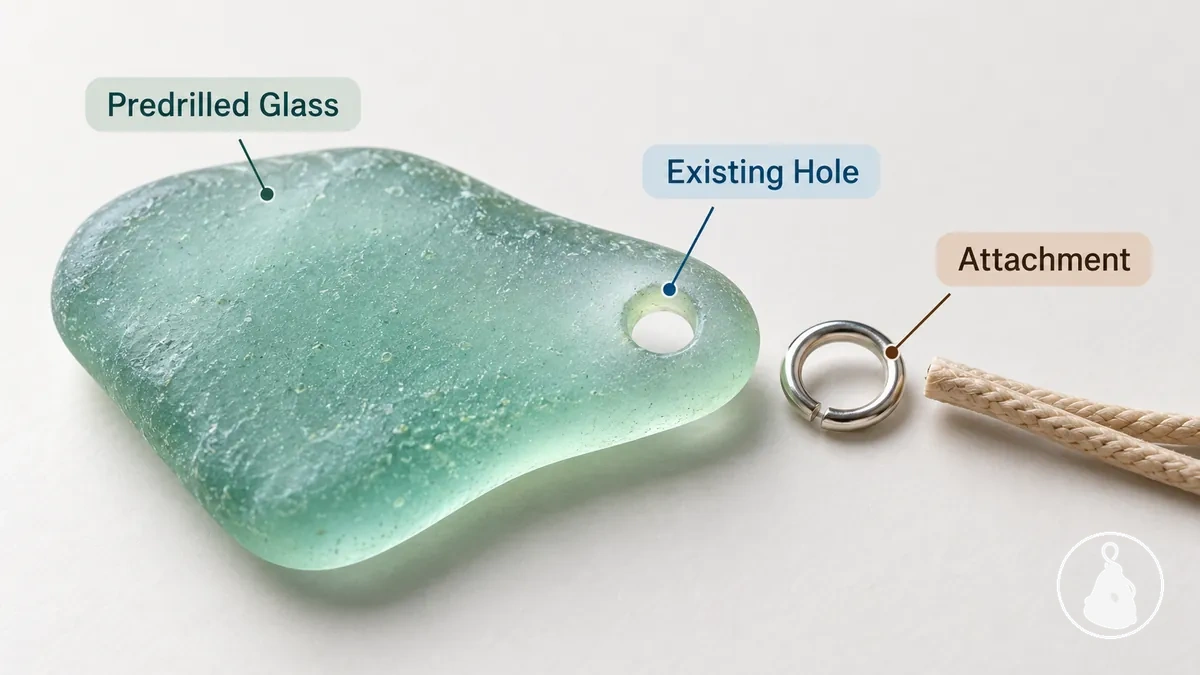
With predrilled sea glass, the hole-creation step is already complete. The existing opening becomes the attachment path, so the remaining work is to inspect that opening and choose a compatible connector or stringing material.
The hole's position, opening size, edge condition, and surrounding glass determine how that attachment path can be used safely and without a forced fit.
Predrilled sea glass
The jewelry connection uses an existing drilled opening, so the maker checks the hole and matches an attachment to it.
No-hole method
The glass is secured without passing an attachment through a drilled opening, so the connection method and fit criteria are different.
Check the Hole Position, Size, and Condition Before Assembly
Inspect the drilled hole in predrilled sea glass before assembly.
Check whether its position, opening size, edge condition, and surrounding glass suit the intended attachment without forcing it through the opening.
A usable drilled hole provides enough clearance for the intended attachment, has no visible edge damage that obstructs the connection, and retains intact surrounding glass at the connection point.
Hole inspection checklist
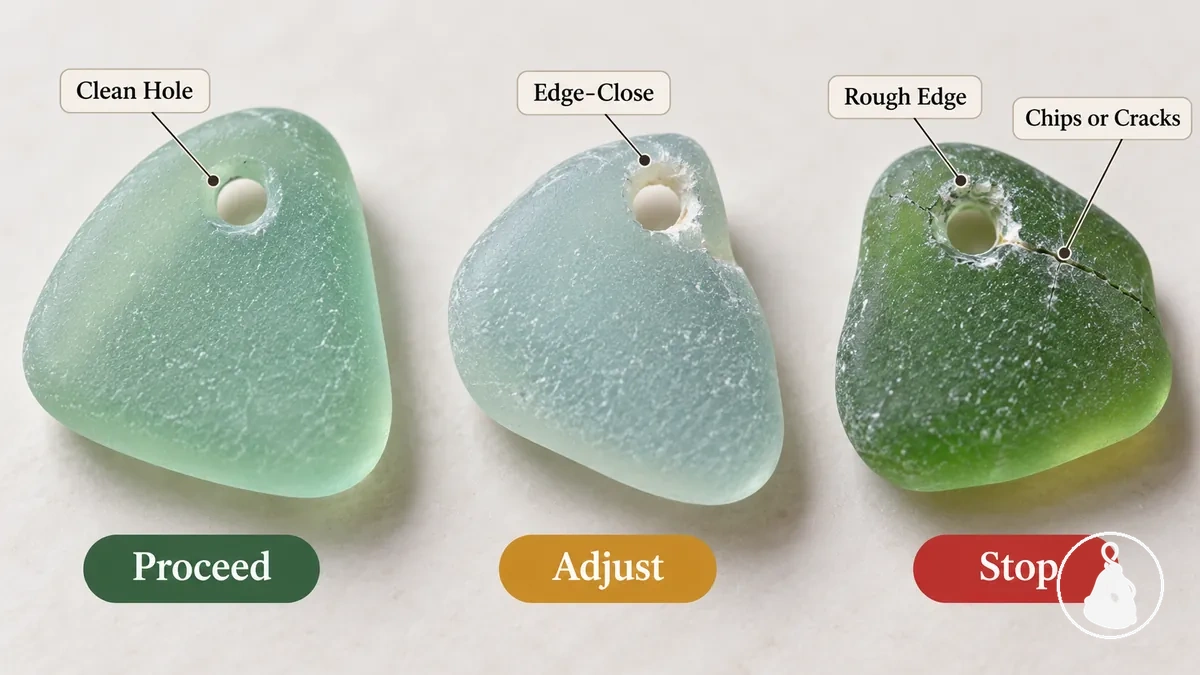
- Hole position: Check where the drilled hole sits in the piece and whether intact surrounding glass is visibly present around the intended connection point.
- Hole size: Check the opening relative to the intended attachment; the opening should accommodate the component without requiring a forced fit.
- Edge smoothness: Check for a smooth passage rather than a rough or irregular edge that obstructs the attachment.
- Surrounding glass: Check the amount and condition of glass around the drilled hole; an edge-close or visibly compromised area calls for adjustment rather than assuming the connection is suitable.
- Chips or cracks: Check for visible chips or cracks at or extending from the opening; either condition means the piece should not be assembled as-is.
Proceed
Use the planned attachment when the opening is clean, surrounding glass is intact, and the component has enough clearance to connect without force.
Adjust
Change alignment, connector geometry, or the attachment approach when the hole is edge-close, rough, or too restrictive for the chosen component.
Stop
Do not assemble the piece as-is when a visible chip or crack affects the drilled hole or the glass immediately around it.
This inspection evaluates the drilled connection point, not the overall suitability of the whole sea glass piece for jewelry making.
Match Findings, Cord, or Beading Wire to the Predrilled Hole
Compatibility depends on how the chosen jewelry finding, cord, or beading wire fits and moves through the predrilled hole. A suitable fit has enough clearance to pass or connect without force while allowing the movement, bend, or closure the connection requires.
Evaluate the component and the hole together: thickness, rigidity, bend path, and closure geometry can make an attachment unsuitable even when it reaches the opening.
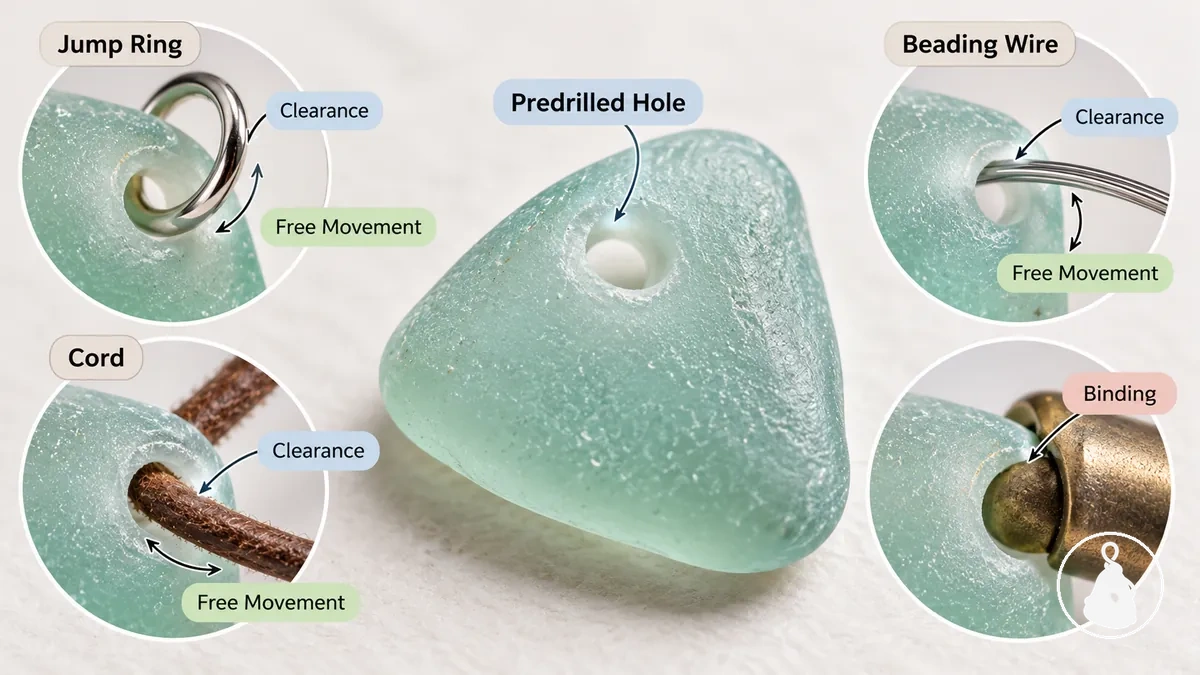
| Attachment type | Relevant component attribute | Hole-related fit condition | Practical result |
|---|---|---|---|
| Metal connector such as a jump ring | Thickness, closure geometry, and bend path | The connector enters the predrilled hole without force and can close without binding against the glass. | The connection can close while retaining the intended movement; binding indicates that another connector geometry or attachment approach is needed. |
| Cord | Thickness and flexibility | The cord passes through the predrilled hole with clearance rather than compressing tightly against the opening. | The cord can move through the hole as intended; a tight or forced passage calls for a different cord thickness or attachment approach. |
| Beading wire | Thickness, rigidity, and bend radius | The wire threads through the predrilled hole with clearance and follows the required path without a sharp forced bend at the glass. | The wire can follow the intended connection path; binding or a forced bend signals a poor local fit and possible concentrated pressure at the hole. |
If a jump ring closes without binding, cord passes with clearance, or beading wire follows its required path without a forced bend, the local fit supports that attachment approach.
If a component catches, binds, compresses tightly in the hole, or cannot follow its required bend or closure path, choose a different component geometry or attachment approach; broader findings and jewelry materials choices are a separate materials decision.
The decision rule is simple: use a non-forced fit that preserves the movement or closure required by the connection.
Attach Predrilled Sea Glass Through the Existing Hole
Attach predrilled sea glass through the existing hole by aligning a compatible connector or stringing material, making the connection, securing it, and checking the finished fit.
The shared sequence is position, connect, secure, verify. A connector that binds at the existing hole should not be pushed into position.
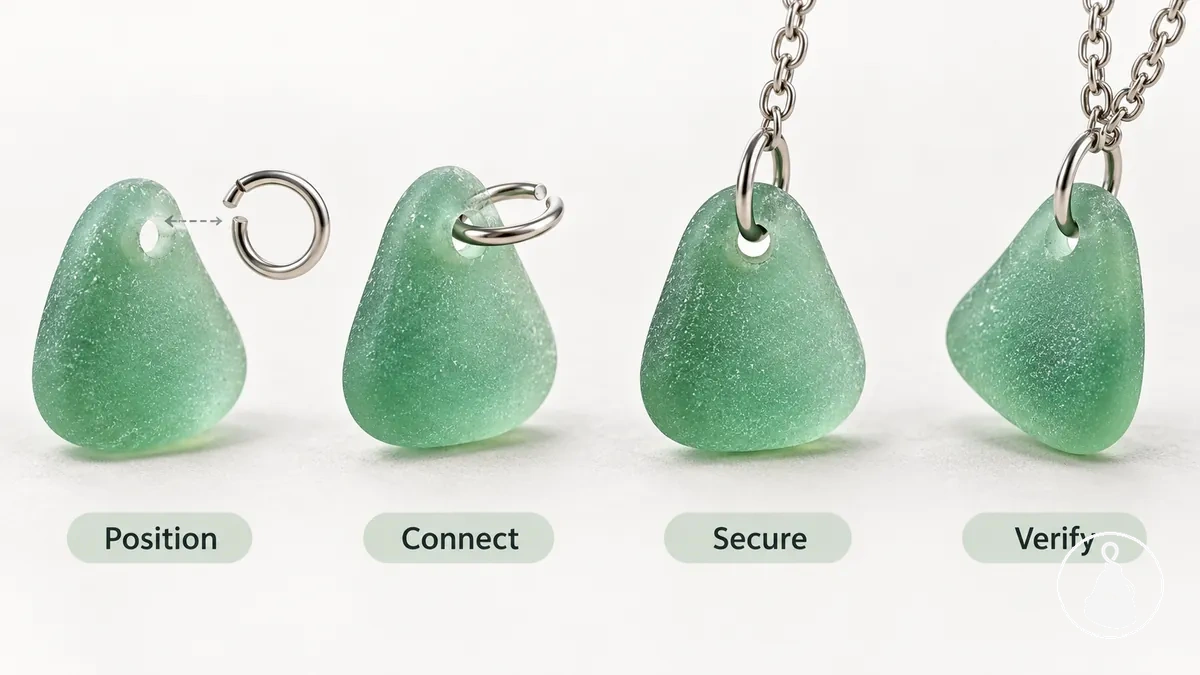
- Position: Orient the predrilled sea glass so the existing hole and compatible connector or stringing material have a clear, unobstructed connection path.
- Connect: Align the attachment component with the existing hole and insert or connect it only while it follows the required path without binding.
- Secure: Secure the jewelry connection according to the attachment type so the component is retained at the intended connection point.
- Verify: Check the finished connection for secure closure or retention, intended movement, and a load direction that does not produce binding or visibly concentrate pressure around the existing hole.
Connect Top-Drilled Glass With a Jump Ring
Use a jump ring to attach top-drilled sea glass when the ring fits through the hole with enough clearance to move without wedging at the glass edge.
Hold the ring with pliers and twist it open sideways rather than pulling its ends apart, then guide it through the drilled opening only while adequate clearance is present.
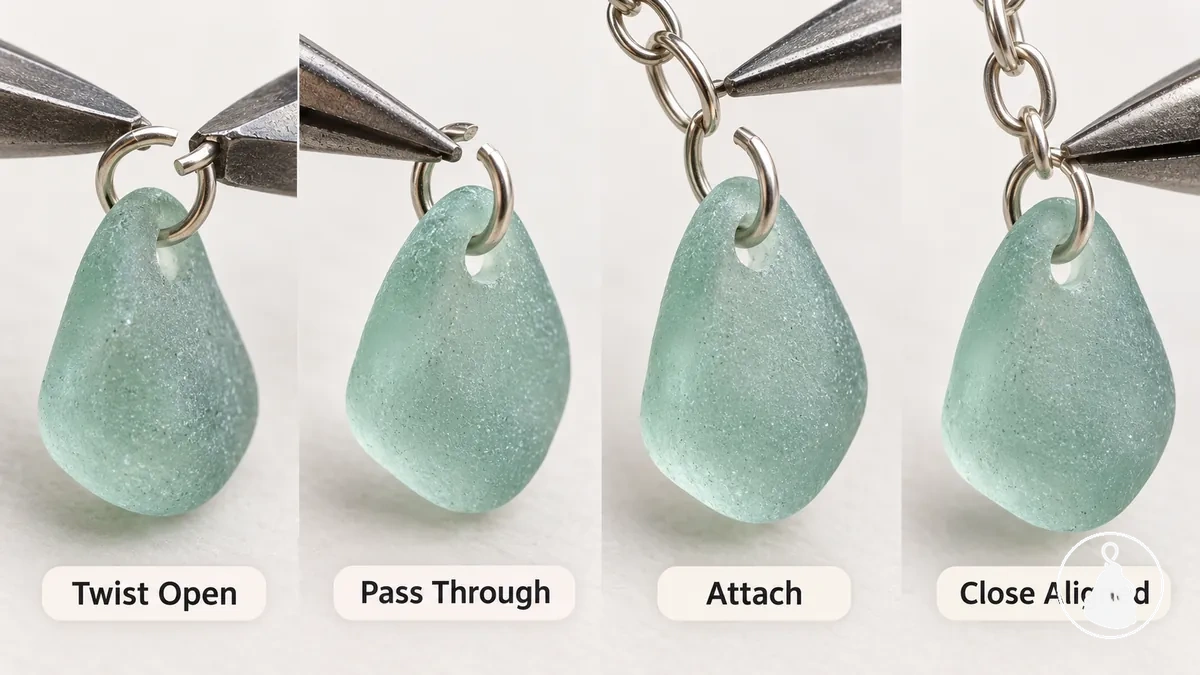
- Open: Grip the jump ring with pliers and twist its ends sideways in opposite directions rather than pulling them apart.
- Pass through: Guide the opened jump ring through the hole in the top-drilled sea glass along a clear path, without using the hole edge as a pressure point.
- Attach: Add the intended downstream connection to the jump ring while keeping the drilled glass and connector ring positioned without wedging at the hole.
- Close: Twist the jump ring back toward its closed position until its ends return to alignment.
After closing, confirm the ring ends are aligned and the sea glass moves as intended without wedging at the hole edge.
Thread Drilled Glass on Cord or Beading Wire
Thread drilled sea glass directly on cord or beading wire only when the material passes cleanly through the hole without binding or excessive friction.
For a bead or predrilled pendant, align the cord or wire with the drilled opening and follow a straight pass-through path.
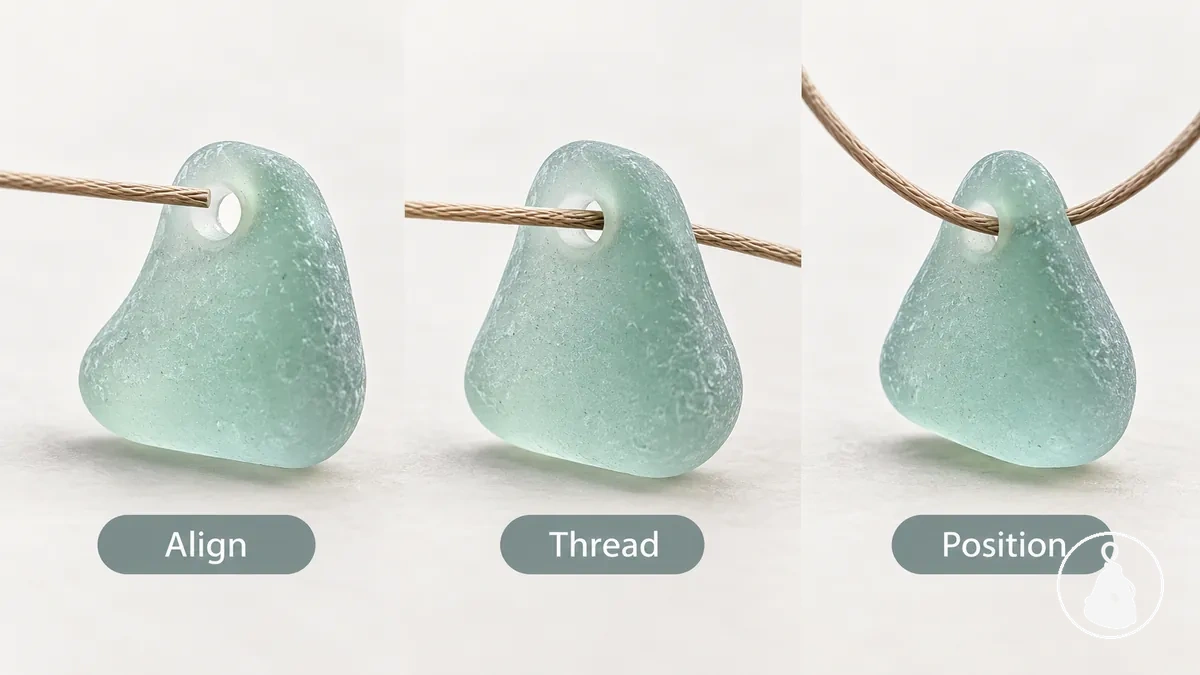
- Align: Position the cord or beading wire in line with the hole so it approaches the drilled opening on a straight path.
- Thread and position: Pass the cord or wire straight through the hole while it moves cleanly, then position the drilled sea glass at the intended point in the jewelry assembly.
- Secure: Secure the downstream connection appropriate to the necklace, pendant, or other larger jewelry assembly without expanding the process beyond the local threaded connection.
If the cord or wire catches, binds, or meets noticeable friction, stop instead of increasing pressure. Recheck the straight pass-through alignment; if resistance remains, change the attachment approach.
Avoid Stress and Damage Around the Drilled Hole
Binding, restricted clearance, or an attachment that requires force can concentrate stress around the drilled hole instead of allowing the connection to move through its intended path.
A visible chip or crack is a stop condition. Binding or resistance is different: first check alignment, clearance, edge condition, and connector movement to see whether the fit can be corrected without force.
Check whether a jump ring catches or wedges, and whether cord or wire still requires force after its path is straightened. The table connects each warning sign to a likely local cause, a check, and a corrective action.
| Warning sign | Likely cause | Check | Corrective action |
|---|---|---|---|
| Jump ring binds at the drilled hole | Connector movement may be restricted by insufficient local clearance or by the ring pressing against the hole edge. | Move the attachment through its intended range and observe whether the ring catches, wedges, or presses against the drilled hole. | Adjust the connector position or choose a different attachment approach if the ring cannot move through its intended path without binding. |
| Cord or wire requires force to pass through | The stringing path may have insufficient clearance, poor alignment, or friction at a rough hole edge. | Check whether the cord or wire follows a straight path through the hole and whether resistance remains after correcting its alignment. | Stop applying force and change the attachment approach if the cord or wire still cannot pass cleanly. |
| Visible chip or crack at the drilled hole | The drilled area has visible damage at or beside the attachment point. | Inspect the edge condition and surrounding glass to identify where the visible chip or crack reaches around the drilled hole. | Do not assemble the piece as-is. |