Drilling Sea Glass for Jewelry Without Cracking or Chipping
To drill sea glass for jewelry with a lower risk of cracking or chipping, use a diamond-coated bit and wet drill with light pressure, stable support, controlled speed, and water at the glass-bit contact. Start with a shallow angled groove, lift the bit periodically to clear slurry and limit heat, and ease pressure as breakthrough approaches; very thin, badly chipped, or cracked pieces may still be poor drilling candidates.
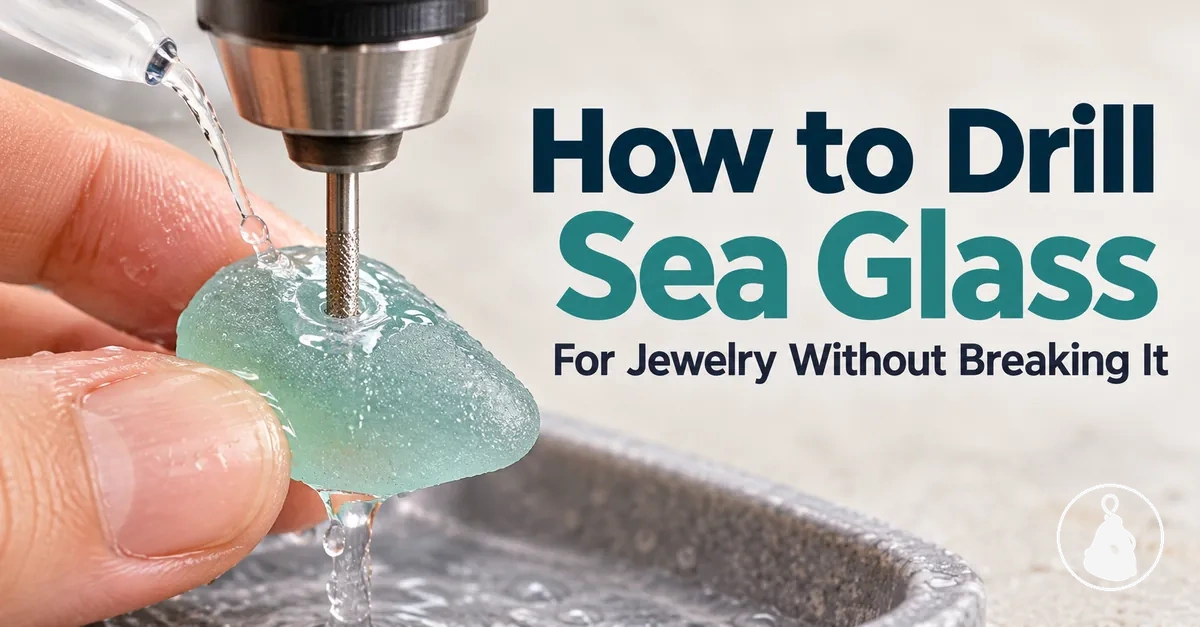
Controlled wet-drilling map
Use the drilling sequence and the observable cues together. There is no single RPM, starting angle, or edge-distance value that suits every combination of glass, bit, and rotary tool.
Adjust from these cues
- Bit skates
- Stop and re-seat it in the starting groove.
- Cut becomes hot or dry
- Restore water, clear debris, and ease pressure before continuing.
- Glass shifts
- Stop and re-establish stable, distributed support.
- Exit side becomes thin
- Keep alignment and reduce pressure for the final breakthrough.
Wet-work boundary: water belongs at the glass-bit contact; keep the powered rotary tool, plug, cord connections, and other electrical connections clear of the wet area and follow the tool manufacturer's instructions.
The safest practical approach is to control the setup first, then adjust drilling from the behaviour of the glass, bit, water, and cut rather than forcing one universal setting.
Table of Contents
Set Up Sea Glass for Controlled Wet Drilling
Prepare the drilling area before the bit touches the glass: mark the hole, stabilise the piece, arrange water at the cut, put on eye protection, and confirm that the rotary tool and bit are ready.
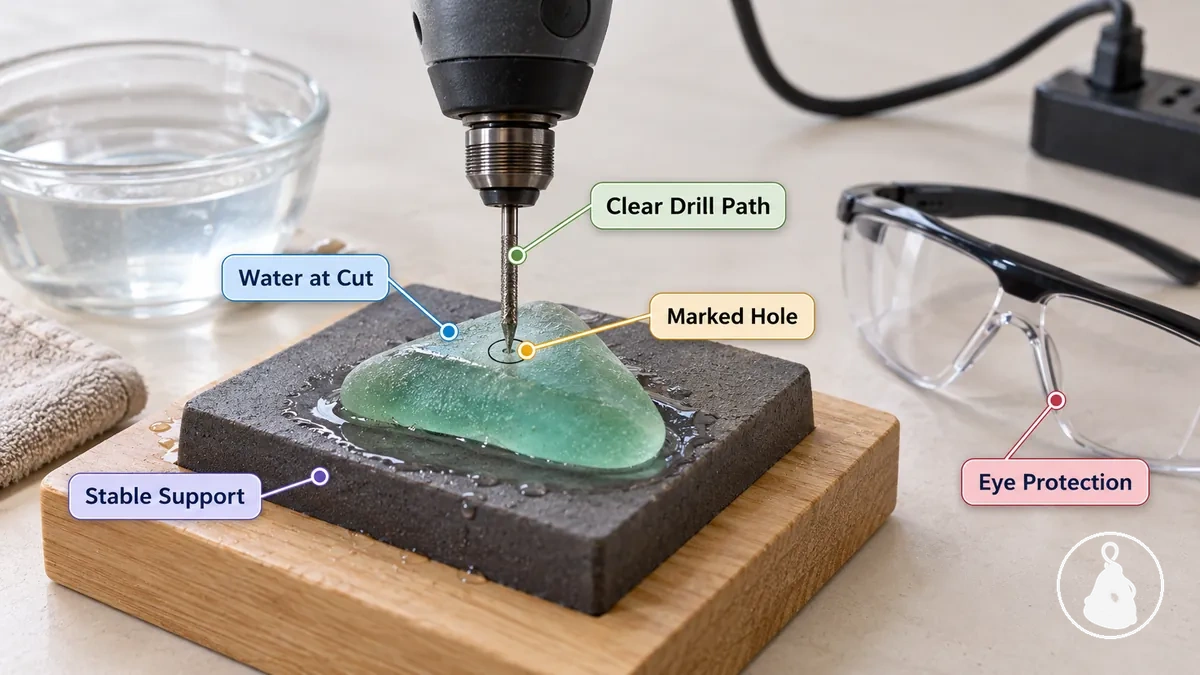
Pre-drilling sequence
- Place the sea glass on stable support so the piece cannot readily shift as the rotary tool approaches the marked hole.
- Confirm that the marked hole is visible and position the sea glass so the drill path remains clear of fingers and other obstructions.
- Arrange water at the cut so the drilling contact remains wet for cooling and glass dust can move away from the cutting area.
- Put on eye protection before operating the rotary tool, and keep the work area sufficiently visible to monitor the bit and sea glass.
- Check that the rotary tool, bit, power lead, and controls are ready for use while electrical connections remain clear of the wet work area.
Fit a Diamond-Coated Bit to a Controllable Rotary Tool
Fit a diamond-coated bit whose cutting diameter suits the intended jewelry hole and whose shank seats securely and straight in the rotary tool's chuck or collet.
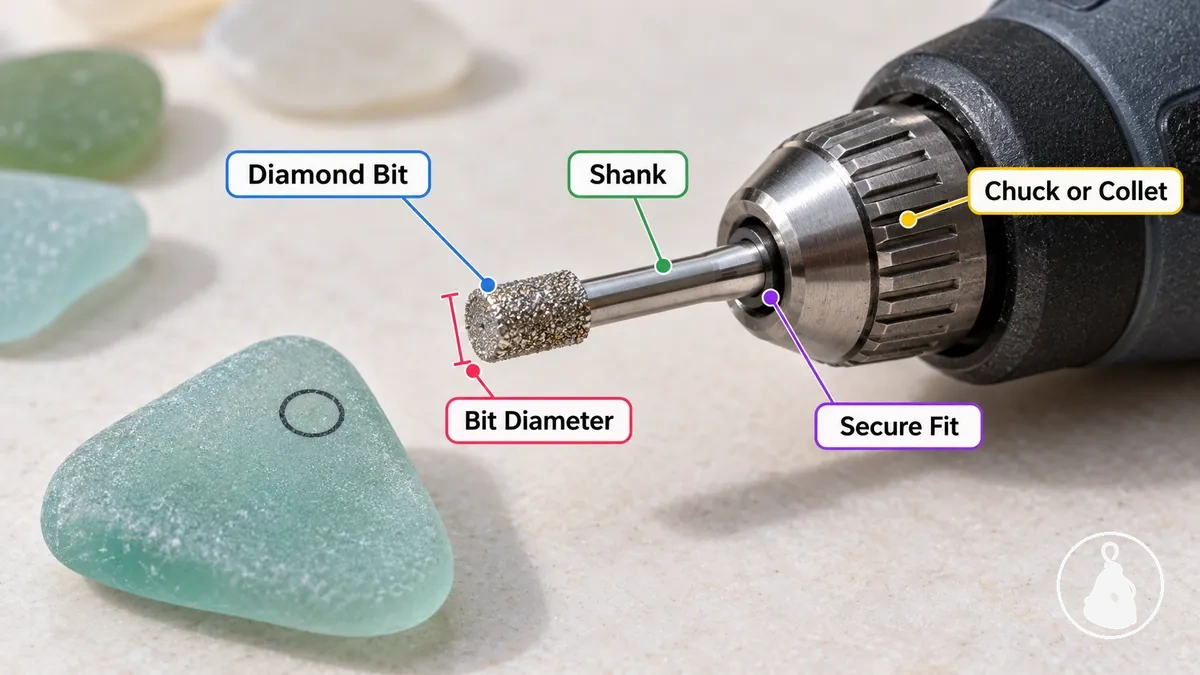
- Hole requirement
- Choose a cutting diameter that suits the intended jewelry hole rather than relying on one universal bit size.
- Tool fit
- The bit shank must be compatible with the chuck or collet and held securely.
- Tracking condition
- Aligned seating and steady tool control help the bit follow the marked position instead of wandering.
A loose, mismatched, or poorly seated bit reduces control. Verify the bit-to-tool fit before drilling, and do not force an unstable cut merely to make progress.
Mark the Hole Away From Fragile Edges
Choose a hole position with sound glass around the intended cut rather than beside a chipped, cracked, very thin, or narrow edge. The usable margin depends on local glass thickness, hole diameter, shape, and existing damage, so a single edge-distance measurement should not be treated as universal.
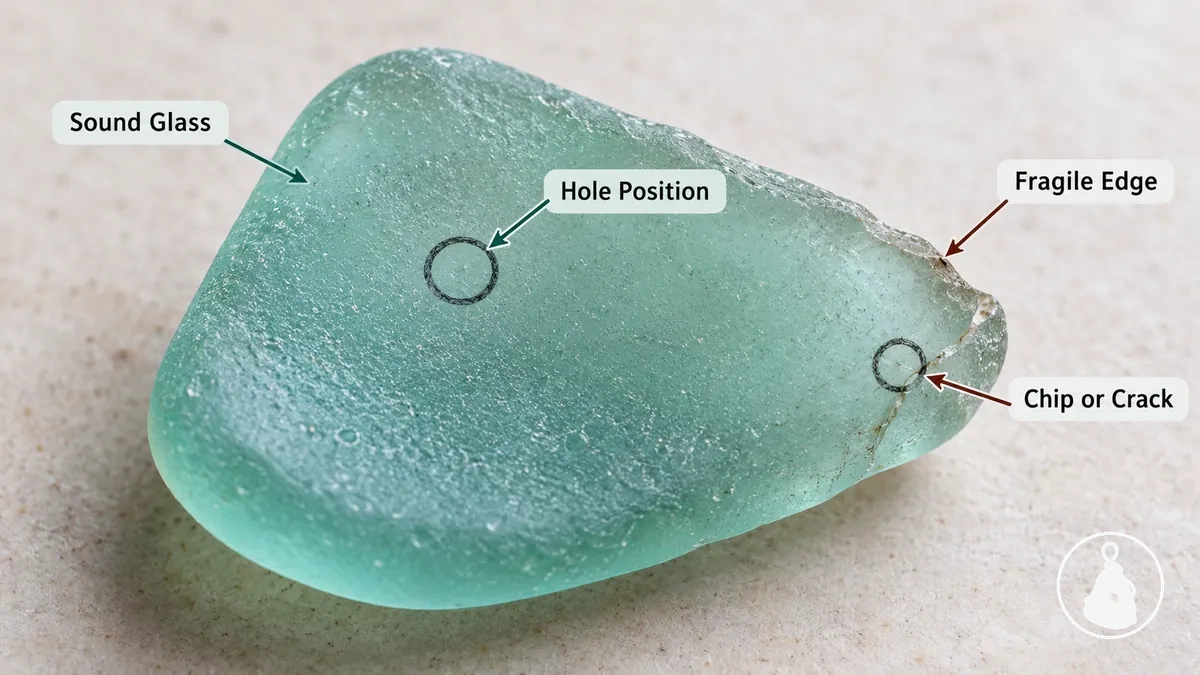
Hole-position checks
- Edge integrity: place the mark where the surrounding sea glass is sound rather than visibly chipped or cracked.
- Glass thickness: inspect the local thickness at the hole position; avoid a thin or narrowing area when it leaves little sound glass around the intended cut.
- Hole diameter: check that the intended jewelry hole leaves sound glass around its perimeter rather than crowding the sea glass edge.
- Nearby damage: inspect the local area for any chip or crack that places the planned cut beside visibly damaged glass.
As the planned hole occupies more of a locally thin or narrow area, less sound glass remains between the cut and the edge. Prefer the position that preserves the strongest intact margin around the hole.
Support the Glass Without Concentrated Pressure
Support the sea glass with soft, distributed contact and use only enough restraint to prevent movement while keeping hands clear of the drill path. Hard contact points or excessive clamping can concentrate stress in brittle glass.
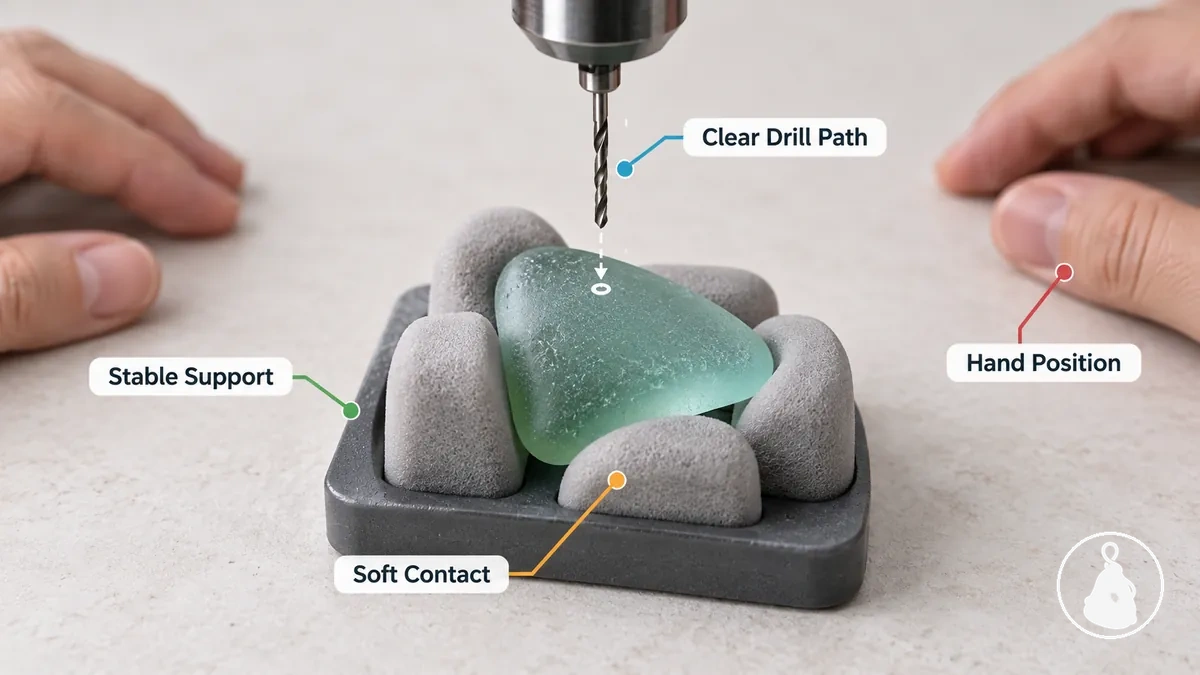
Support requirements
- Soft contact: support or restrain the sea glass against a soft-contact surface rather than hard metal contact directly against the glass.
- Clear drill path: position hands outside the path of the bit while the support keeps the workpiece from shifting.
- Restraint pressure: use sufficient holding pressure to stop movement without applying excessive clamping force at a small contact area.
Drill the Hole With Controlled Angle, Speed, and Pressure
Drill by coordinating bit angle, controlled speed, light pressure, water, and cutting progress rather than treating any one setting as fixed. If heat rises, tracking becomes unstable, or cutting slows while debris accumulates, stop forcing the cut and correct the observable condition.
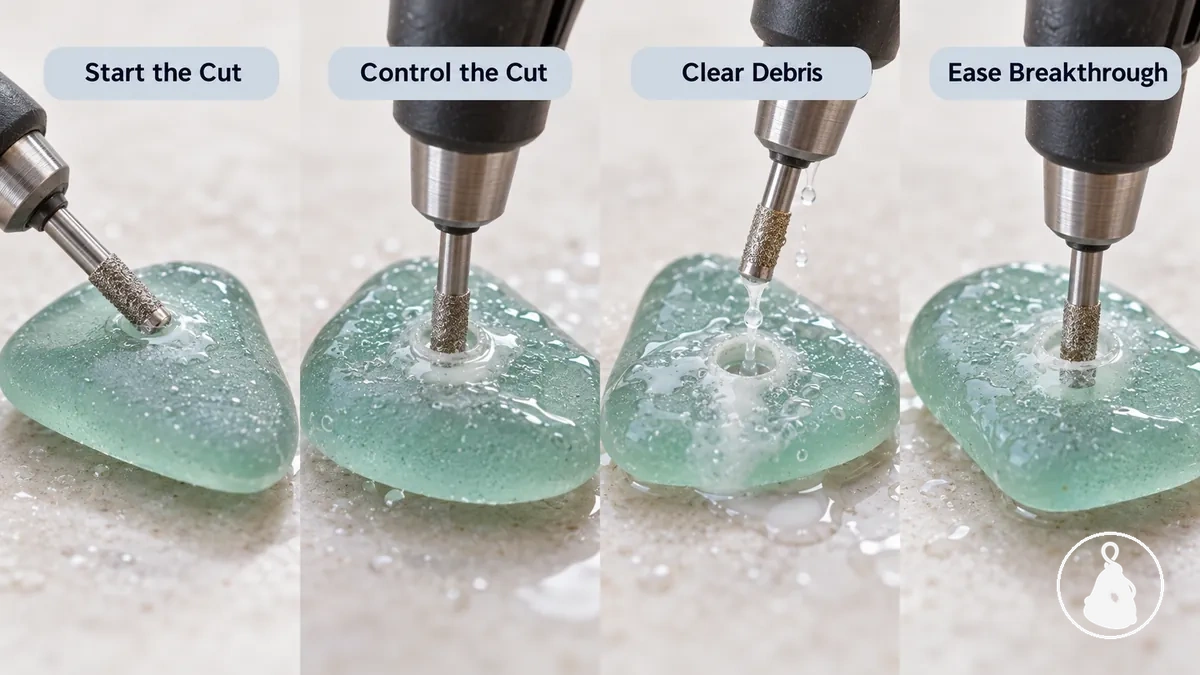
Four-stage drilling sequence
- Establish the cut: bring the diamond-coated bit into controlled contact at the intended bit angle with light pressure; once the bit tracks in the developing groove, move toward a steadier drilling position.
- Control the cut: continue at controlled speed with light pressure and water at the cutting contact; if tracking becomes unstable or heat increases, ease pressure and reassess speed, cooling, and bit position.
- Clear the cut: periodically lift the bit so water can reach the cutting area and slurry and debris can move out of the hole; resume while observing cutting progress and heat.
- Ease through breakthrough: as the remaining glass becomes thin and breakthrough approaches, reduce pressure while maintaining cooling, alignment, and controlled movement through the final part of the cut.
Use a controlled speed within the operating guidance for the specific rotary tool and diamond-coated bit. Cooling, steady tracking, and controlled cutting are more useful guides than one universal RPM value.
Start the Cut at an Angle to Seat the Bit
Begin with light angled contact so the diamond-coated bit forms a shallow starting groove at the marked point. The purpose of the angle is to seat the bit and limit skating, not to hold one exact angle for every piece.
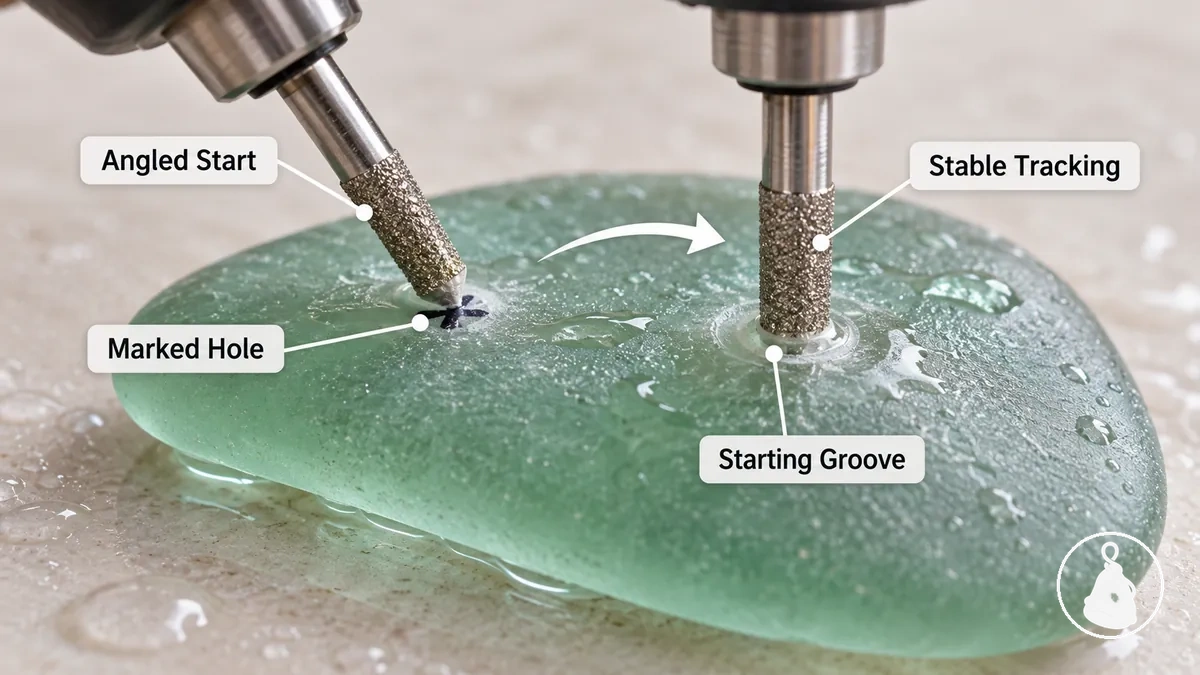
Keep Water at the Cut While Drilling
Keep the cutting contact visibly wet while the bit is working. Water cools the drilling area and helps carry fine glass debris away as slurry; if the cut begins to dry or heat increases, stop and restore water before continuing.
Wet drilling does not make cracking impossible, and the water-delivery method must remain compatible with the rotary tool. Keep the powered tool and electrical connections clear of the wet area and follow the manufacturer's wet-working and electrical-safety guidance.
Lift the Bit Periodically to Clear Debris and Limit Heat
Use a pulse-and-lift rhythm: cut briefly, lift the bit so water can return and slurry can escape, assess the cut, then resume. The interval should follow cutting behaviour rather than a fixed timer.
Ease Pressure as the Bit Approaches Breakthrough
As the exit-side glass becomes thin, reduce pressure while maintaining cooling, support, and alignment. The goal is to let the bit cut the final layer rather than punch through it under greater force.
Continue from the original side
Use reduced pressure and stable alignment through the final layer. This is the simpler route when a second-side hole cannot be aligned accurately.
Optional two-sided completion
Drill from the second face only when the hole can be aligned accurately from both sides and the piece can remain securely supported during the second cut.
Prevent Cracks, Chips, and Other Drilling Failures
Use the location and timing of the damage to decide what to check first. Cracking or chipping can have more than one contributor, so a symptom is a troubleshooting cue rather than proof of one cause.
| Symptom | Condition to check | Likely contributor | Corrective action |
|---|---|---|---|
| Cracking develops during drilling | Check whether the cutting area remains wet and whether heat is building at the cut. | Insufficient water, accumulated debris, or excess pressure can contribute to heat and stress at the drilling area. | Restore water at the cut, clear debris, and resume with lighter controlled contact. |
| Sea glass shifts or cracks while the bit is cutting | Check whether the piece moves, rocks, or is restrained at a concentrated contact point. | Unstable support can allow movement or concentrate stress in the glass. | Reposition the piece on stable, distributed support before retrying the cut. |
| Chipping begins beside the intended hole | Check the hole placement for a thin, narrow, chipped, or otherwise damaged surrounding area. | Hole placement with little sound glass around the cut can leave a vulnerable margin. | Use a position with more sound glass around the intended hole when the piece provides one. |
| Chipping or blowout appears at breakthrough | Check whether the remaining glass at the exit side became thin while applied pressure remained comparatively high. | Greater applied force during final breakthrough can contribute to exit-side chipping. | Ease pressure as breakthrough approaches while maintaining support and alignment. |
Cracking From Heat, Dry Drilling, or Excess Force
Cracking risk rises when the cut becomes dry or hot, when debris prevents effective cooling, or when excessive force increases mechanical stress on the sea glass. A crack is a symptom, not proof of one cause.
If the cut is dry or heating, restore water and clear debris; if contact is heavy, ease pressure. Reassess speed, bit position, support, and tool control only as needed to restore steady cutting within the equipment's operating guidance.
Change the observable drilling condition associated with the problem rather than assigning one cause from the crack pattern alone.
Chipping at the Exit or Near the Glass Edge
Exit-side chipping points first to breakthrough control and support, especially when the remaining glass became thin while applied pressure stayed comparatively high. Ease pressure while maintaining alignment through the final layer.
Edge-origin chipping points first to the hole position and the integrity of the surrounding glass. Check whether a chip, crack, thin area, or narrow shape leaves too little sound material around the intended cut.
These patterns can overlap, so use the chip location to choose the next condition to inspect rather than treating it as proof of a single cause.
Finish and Inspect the Drilled Hole
Before using the drilled sea glass in jewelry, rinse and dry it so the hole perimeter is easy to inspect. A usable hole should have intact surrounding glass with no visible crack or severe chip that compromises the drilled area.
Post-drilling inspection
- Rinse: remove loose drilling residue from the drilled hole and surrounding glass.
- Dry: dry the sea glass so water does not obscure the condition of the hole perimeter.
- Inspect the hole perimeter: examine both openings of the drilled hole and the surrounding glass for a rough edge, chip, or crack.
- Assess structural integrity: distinguish minor roughness from a crack or severe chip that extends into the glass around the hole.
- Smooth only when appropriate: use limited smoothing for a sharp or rough edge when the surrounding glass remains intact; do not treat smoothing as a correction for a crack or severe chip.