How to Make a Sea Glass Pendant
To make a sea glass pendant, start with prepared glass and choose the attachment route from the glass condition: use a bail or connector for a usable drilled hole with intact edges, or use a wire wrap, supporting setting, or compatible bonded attachment for undrilled glass when the shape and contact area suit that method. Secure the attachment, connect a cord or chain through a bail or connector that closes without an unintended gap, then confirm the glass stays retained, the pendant moves without binding, and no sharp exposed ends remain before wear.
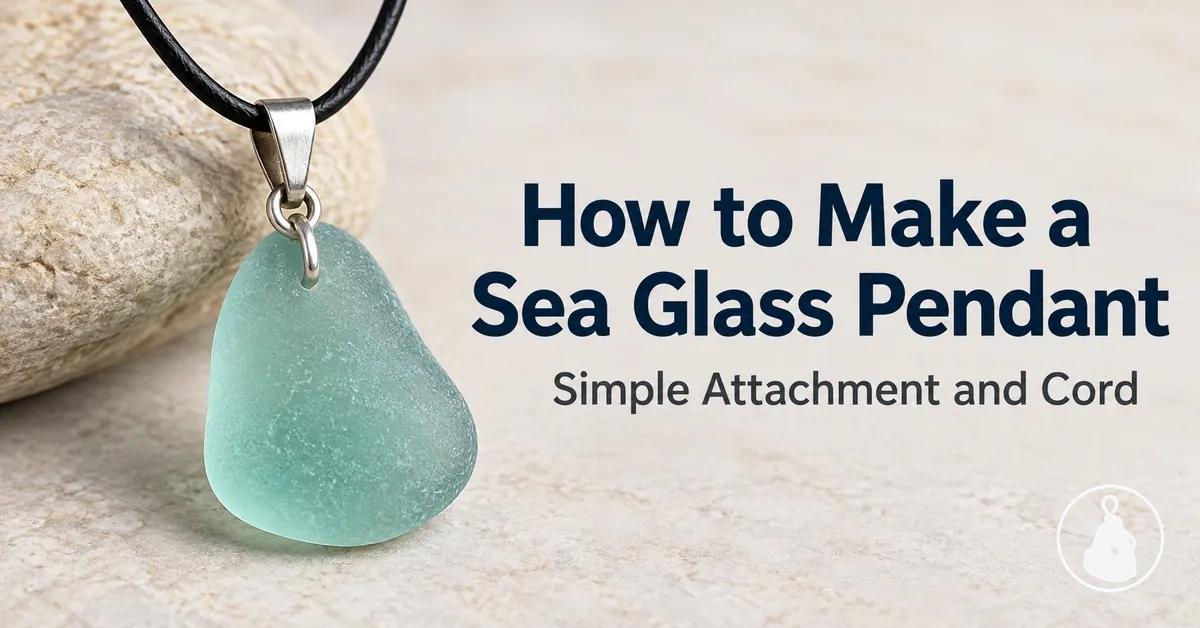
Choose the attachment route before assembly
The prepared glass determines the first connection. Match the attachment to the hole, contact area, or shape before you secure anything.
Drilled glass + usable hole
Bail or connector through the hole. The finding should pass or seat without forcing the glass and still provide a secure point for the cord or chain.
Undrilled glass + suitable contact area
Bell cap or another compatible surface-contact attachment. The contact area must match the attachment geometry; any adhesive must suit the materials and reach its specified cure before wear.
Undrilled or irregular glass needing external support
Wire wrap, bezel, or supporting setting. The method must retain the individual shape at its intended support points without relying on concentrated force.
Pass condition: the glass and suspension remain captured, required closures have no unintended opening, the pendant hangs without obvious binding, and wear-facing surfaces have no sharp exposed ends. This is a practical pre-wear check, not a guarantee of future durability.
This guide assumes the sea glass is already prepared. Drilling, full wire-wrapping techniques, and custom setting fabrication are separate processes; the steps below focus on matching, assembling, and checking the pendant connection.
Table of Contents
Gather Prepared Sea Glass and Pendant Components
Before assembly, gather only the components required by the chosen attachment route. The setup is ready when the prepared sea glass, compatible pendant attachment, required connector or route-specific material, cord or chain, and necessary hand tools are present and fit one another.
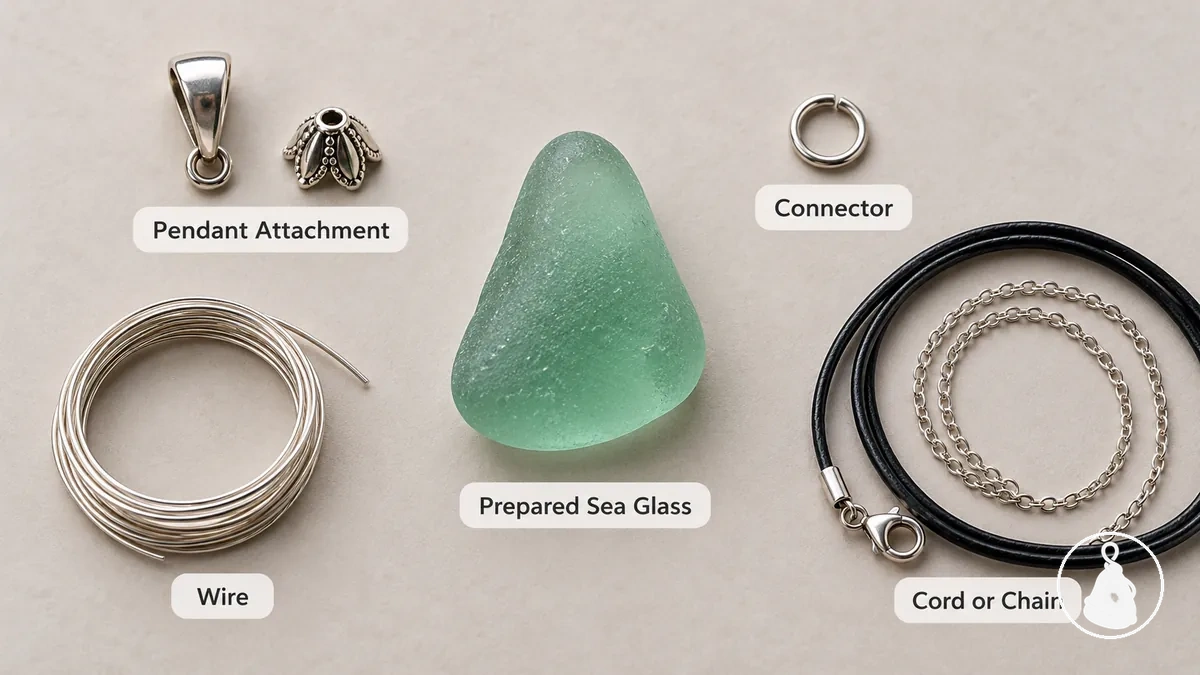
Pre-assembly checklist
- Prepared sea glass: use a piece that is ready for the selected route, with a usable hole, contact area, or support geometry. If the intended attachment point is visibly cracked, chipped, or otherwise unsuitable, resolve that before assembly rather than forcing a finding into place.
- Pendant attachment or jewelry finding: have the bail, bell cap, setting, or other finding that matches the selected route and the individual glass shape.
- Connector: include a jump ring or another connector only when it is needed between the pendant attachment and the cord or chain. A closable connector should be able to finish without an unintended gap.
- Cord or chain: confirm the suspension can pass through or connect to the attachment. If a fixed bail must slide over a chain end or clasp, that wider end fitting—not only the chain itself—must fit through the opening.
- Wire: include wire only for a wire-based route, and use wire that can follow the intended support path without requiring force that could damage the glass or distort the attachment.
- Bonding material: use it only for a bonded route. The adhesive should be specified as compatible with the materials being joined, and the contact surfaces should be prepared as its instructions require.
- Basic hand tools: use only the tools needed to handle, shape, fit, or close the selected findings, such as suitable jewelry pliers for a connector or wire-based connection.
Do not compensate for a poor mechanical fit with extra force or extra adhesive. If the glass geometry, attachment, or suspension does not match, change the component or attachment route before continuing.
Match the Pendant Attachment to Drilled or Undrilled Sea Glass
Match the pendant attachment to the physical condition of the sea glass rather than assuming one finding fits every piece. The deciding attributes are hole condition, glass shape, usable contact area, support geometry, and attachment design.

| Glass condition | Attachment route | Fit condition | Main limitation |
|---|---|---|---|
| Drilled sea glass with a usable hole | Bail or connector through the hole | The finding fits the hole without forcing it, the hole edges are suitable for the connection, and the attachment provides the required suspension point | A hole that is too small, poorly positioned, damaged at the edge, or incompatible with the finding geometry limits this route |
| Undrilled sea glass with a suitable flat or contact area | Bell cap or another surface-contact attachment | The attachment geometry matches a stable contact area; when bonding is used, the adhesive is compatible with the joined materials and is allowed to cure as specified | Limited, uneven, contaminated, or poorly matched contact area can make a surface-contact attachment unsuitable |
| Undrilled or irregular sea glass needing external support | Wire wrap, bezel, or supporting setting | The wrap or setting captures and supports the individual shape at its intended contact points without concentrated pressure | Irregular geometry can prevent a particular wrap or setting from supporting the piece securely |
For drilled sea glass, the presence of a hole is not enough by itself: the chosen bail pin, wire, or connector must fit the hole without being forced, and the connection should not depend on a visibly damaged edge. If the hole needs to be drilled, enlarged, or repositioned, treat that as a separate preparation task before pendant assembly.
For undrilled sea glass, choose between surface contact and external support. A bell cap or bonded finding needs a usable contact area, while a wire wrap or supporting setting depends on the glass shape and its support points; if the geometry cannot be retained without forcing the glass, choose a different route.
Secure the Sea Glass with the Chosen Pendant Attachment
Secure the prepared sea glass using the attachment route already chosen. Keep the finding in its intended alignment and contact position, and stop if the connection requires force that chips the glass, distorts the finding, or shifts the attachment out of position.
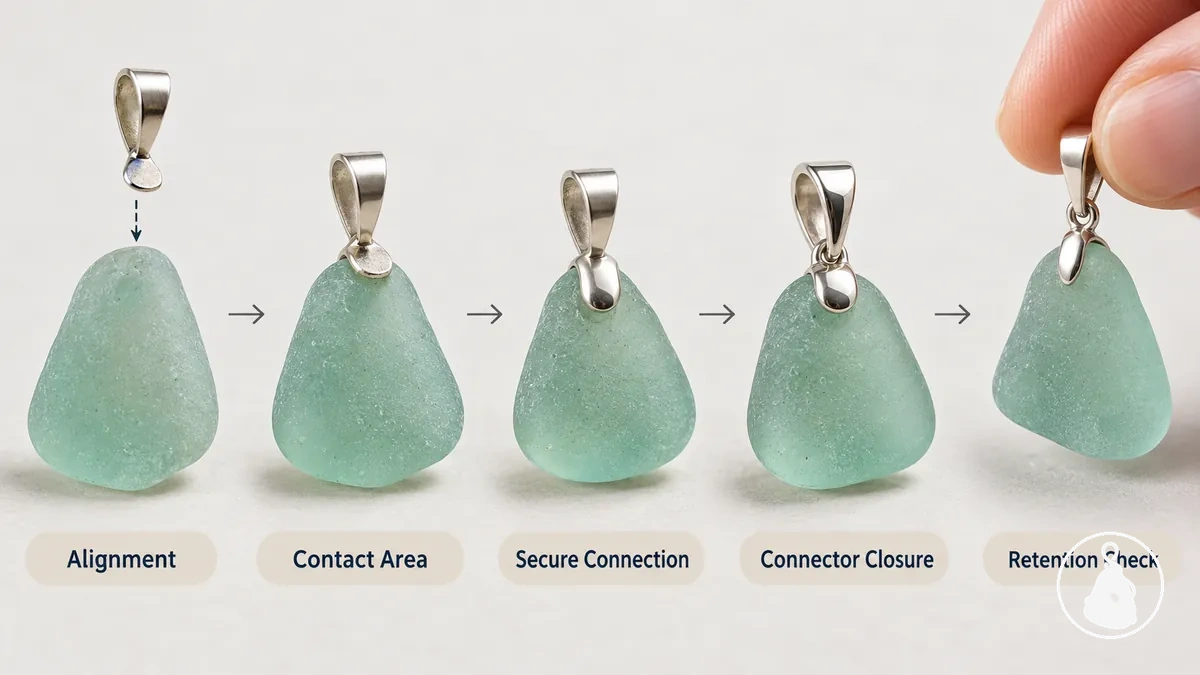
- Align the attachment: Position the bail, bonding surface, wrap path, bezel, or other support at its intended contact point before applying pressure or fastening anything.
- Secure the chosen connection: Fasten, wrap, set, or bond according to that attachment method. With a wire wrap, retention comes from the wire following the intended support path around the glass rather than from a bonded contact surface.
- Finish any connector: Seat and close a closable finding according to its design. For a jump ring, the ends should meet cleanly without an unintended gap that could let the next component escape.
- Let bonded connections cure: Follow the adhesive manufacturer's instructions for surface preparation, application, handling time, and full cure. Do not load or wear the pendant before the bond has reached the cure condition specified for that product.
- Perform a gentle retention check: Handle the glass and attachment lightly. Continue only when the finding stays in its intended position and the glass remains supported or retained.
Misalignment, incomplete fastening, an unfinished connector, a loose wrap, or a bond that has not cured should be corrected before the suspension is added. A gentle handling check confirms the immediate assembly state only; it does not guarantee long-term durability.
Add the Cord or Chain to the Pendant
Add the cord or chain only when the suspension fits the attachment opening or connector, the required closure can finish completely, and the pendant has enough clearance to hang and move without binding.
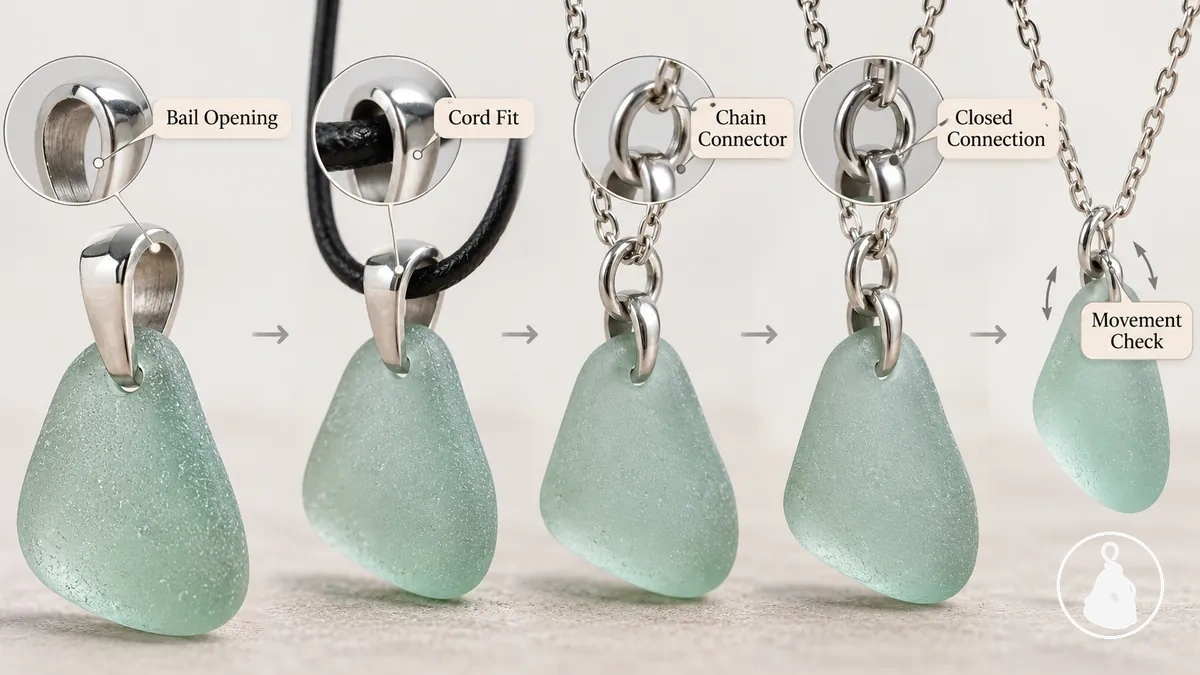
- Check the attachment opening: Test the part that actually has to pass through or connect. For a cord, this may be the cord end; for a chain threaded through a fixed bail, the clasp or end fitting can be wider than the chain and may be the limiting dimension.
- Connect the suspension: Pass the cord through the attachment opening when it fits directly, or use the intended connector between the pendant and chain. The suspension should sit in the designed connection path rather than against a sharp edge or unintended gap.
- Close the connector when present: Close a jump ring or other closable connector according to its design and confirm there is no unintended opening through which the pendant or suspension can slip.
- Check hang and movement: Let the pendant hang and move it lightly. The connection is usable when the pendant remains captured and moves as intended without obvious binding at the bail, opening, or connector.
Fit changes with the relative geometry of the joining parts: a thicker cord, wider clasp, smaller bail opening, or differently shaped connector can make an otherwise suitable component combination incompatible. If the suspension cannot pass, the connector cannot close, or the pendant binds, change the relevant component rather than forcing the connection.
Check the Pendant Connection Before Wearing
The pendant is ready for normal wear only when its visible connection points remain properly positioned under light handling. Check attachment stability, closure, glass retention, suspension retention, exposed ends, and free movement.
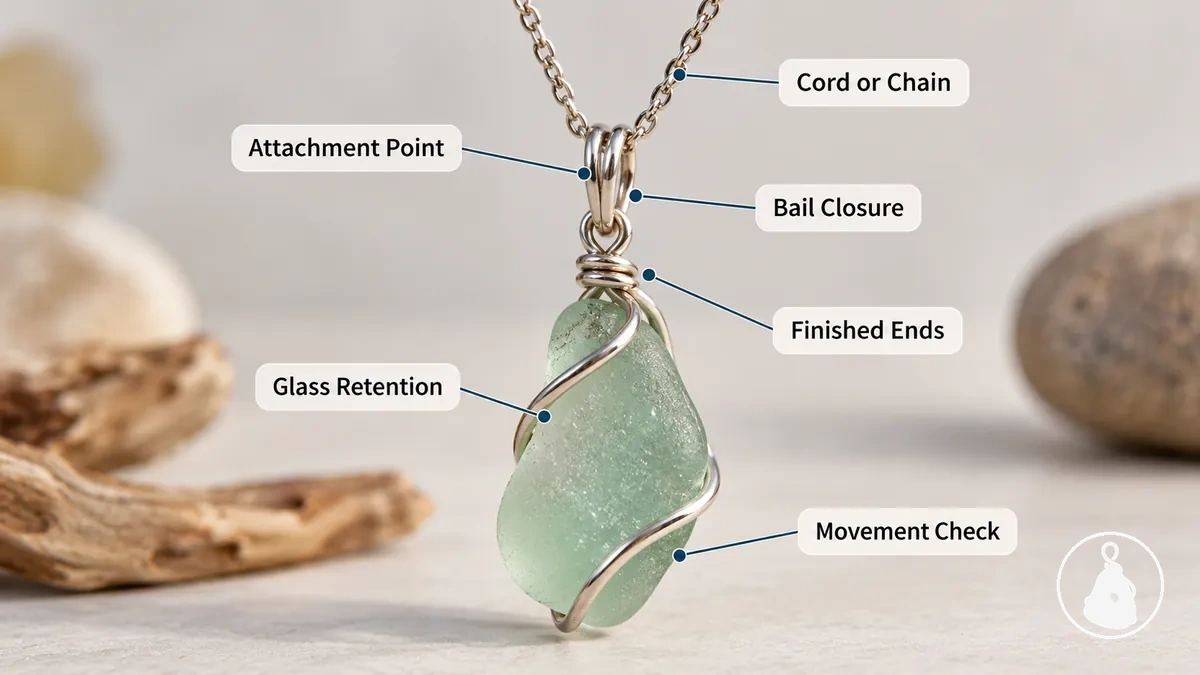
Pre-wear connection checklist
- Attachment movement: Lightly handle the pendant. If the attachment shifts away from its intended position or moves against the glass in a way the design does not require, adjust or remake the connection.
- Bail or connector closure: Inspect every closure. A jump ring or similar connector should not have an unintended opening that can release the next component.
- Glass retention: Confirm the attachment retains or supports the sea glass in its intended position. If the glass can leave that supported position during light handling, the attachment needs correction.
- Cord or chain connection: Confirm the suspension remains captured by the bail or connector and does not move toward or through an unintended opening.
- Exposed ends: Inspect wire and metal ends at wear-facing surfaces. Correct any sharp or exposed end that can catch skin, clothing, or the suspension.
- Pendant hang and movement: Let the pendant hang and move it lightly. It should remain captured and move without obvious binding at the attachment point.
Avoid Common Sea Glass Pendant-Making Mistakes
Most pendant-making problems come from leaving a mismatch or incomplete connection unresolved. The table links each mistake to the visible condition that identifies it and the corrective action that restores the intended attachment path.
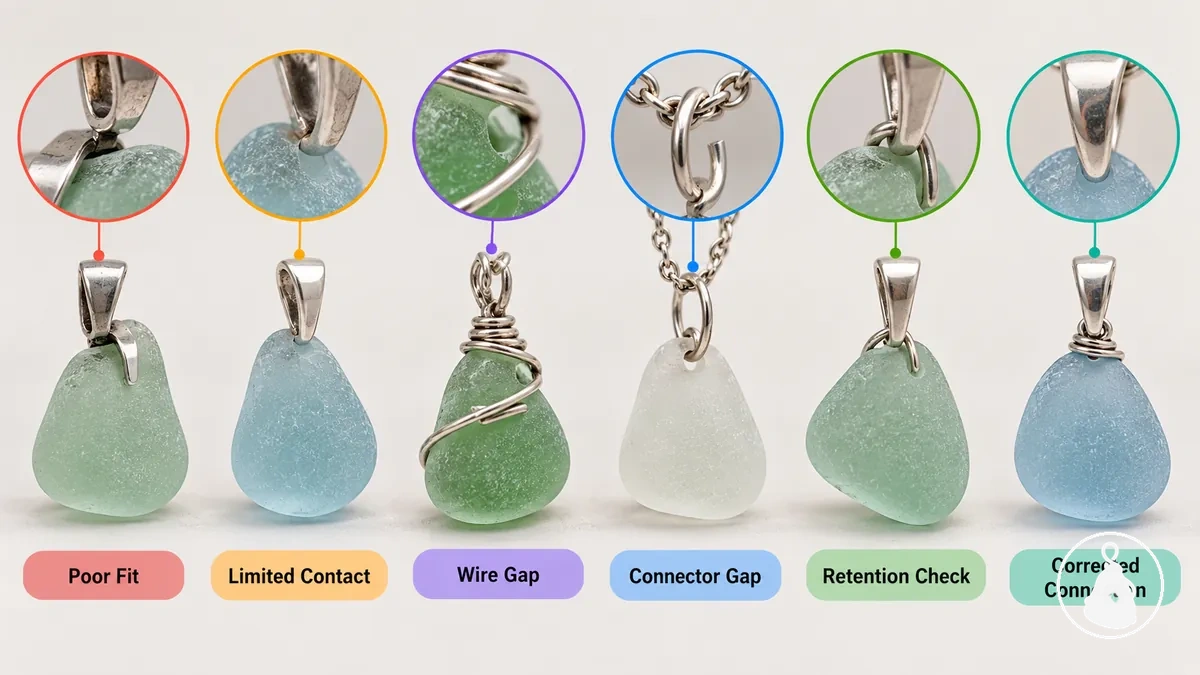
| Mistake | Likely effect | What to check | Corrective action |
|---|---|---|---|
| Attachment mismatch | The glass can be inadequately supported or retained | Movement, poor seating, or contact that does not align with the intended attachment area | Change, reposition, or remake the connection so the attachment fits and supports the prepared glass at its intended points |
| Insufficient contact area or incomplete closure | Retention can be reduced at the attachment or suspension connection | Whether intended surfaces are engaged and whether a closable finding finishes without an unintended gap | Reposition or remake the affected connection so required contact is established and the closure is complete |
| Excessive or uneven force | Concentrated force can chip or crack the glass or distort the finding | Visible glass damage, attachment distortion, concentrated pressure, or a connection pushed out of position | Stop applying force and choose a better-fitting component or revise the attachment method |
| Wire that does not follow the intended support path | Gaps or concentrated pressure can reduce support and create unstable contact points | Whether the wire follows the designed path and supports the glass without obvious gaps, distortion, or pressure points | Adjust or remake the wrap so it conforms to the glass shape and intended support points |
| Bonding on unsuitable surfaces or wearing before cure | The bonded attachment can have inadequate contact or be loaded before it has developed its intended bond | Surface preparation, material compatibility, application instructions, and the adhesive's specified handling and full-cure conditions | Prepare and bond the surfaces according to the adhesive instructions, then allow the specified cure before wear |
| Connector gap | An unintended opening can allow the cord, chain, or pendant connection to escape | Whether connector ends meet as designed and the suspension remains captured | Correct the connector closure before wear; replace a damaged or distorted finding rather than relying on a partial closure |
| Skipping the final retention check | An unresolved movement, closure, sharp-end, or binding problem can remain unnoticed before wear | Attachment stability, glass retention, connector closure, exposed ends, suspension retention, and pendant movement under light handling | Perform the pre-wear check and adjust or remake any connection that shifts, opens, binds, catches, or fails to retain the glass or suspension |
Correct the cause rather than masking it. Poor fit needs a better-matched attachment, a connector gap needs a proper closure, an unstable wrap needs a revised support path, and a bonded attachment needs suitable surface preparation and cure. If unwanted movement, a gap, binding, a sharp end, concentrated pressure, or inadequate retention remains, adjust or remake the affected connection before wearing the pendant.